
It’s easy to get so caught up in shooting macro critters that you end up missing the ‘big picture’ – hence wide-angle skills are an important part of an underwater photographer’s repertoire
Words and pictures by Walt Stearns
There’s no denying the appeal of photographing the elusive marine life that hide in the recesses of a reef. Yet too often, photographers run the risk of getting so caught up in documenting the small details that we end up missing the big picture.
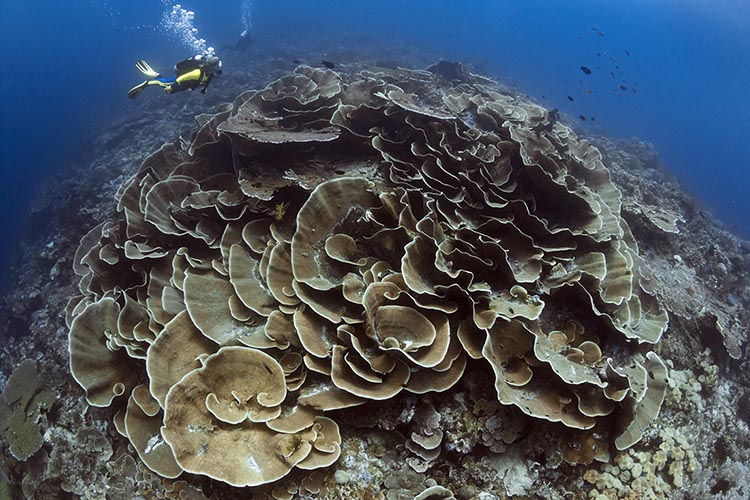
It is those panoramic reef scenes that showcase the true scope and quality of a destination, and the best way to create them is by adding wide and super-wide panoramic shooting techniques to the imaging mix.

Having made several trips to Indonesia’s Wakatobi Dive Resort, I can attest to the fact that a photographer could spend weeks here filling memory card after memory card with spectacular marine life portraits and macro shots, but that is only half the story – to capture the full beauty of Wakatobi’s coral reefs, underwater photographers also need to make sure they focus on the wider story.
Wakatobi’s picture-perfect setting
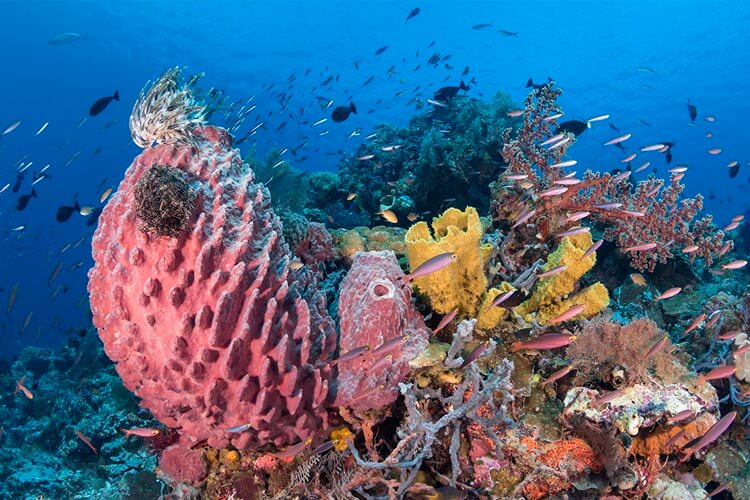
Wakatobi Resort is surrounded by some of the most pristine coral reefs in the world, sustained by the resort’s landmark marine conservation program, which funds a private marine preserve protecting some 20 kilometres of the reef. Evidence of their proactive conservation efforts is readily apparent in the vitality of the reefs.
Wakatobi’s reefs are not just in pristine condition, but are part of some very dramatic underwater topography, with steep slopes and vertical walls that rise to within a few feet from the surface; submerged ridges and seamounts that vault from the depths with peaks cresting in the sun-dappled shallows. In addition, excellent water clarity and an abundance of ambient light create ideal conditions for shooting wide-angle images.
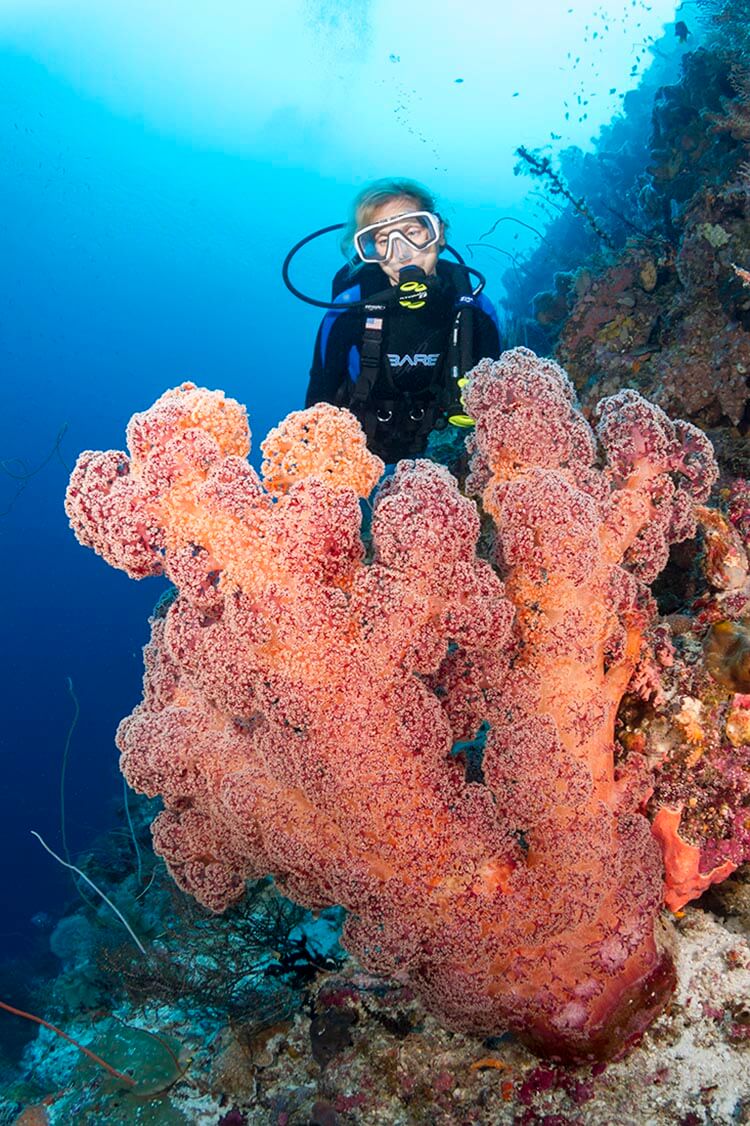
Lighting the Rose
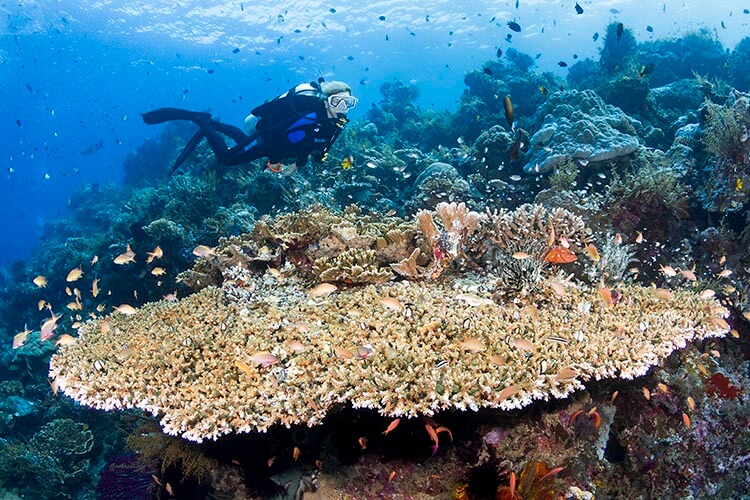
At Wakatobi’s dive site, Roma, there is a giant scroll coral formation nicknamed ‘the rose’ for its obvious shape when viewed from above. I felt my best option was to choose a fisheye lens and shoot using only ambient light, as there was plenty available. Using strobes would only serve to light up the small amount of particulate in the water column between the coral and me.
Since there are no straight lines on a reef, the barrel-like distortion created by the fisheye’s optics is seldom an issue. In fact, the opposite is true, as the distortion can lend a little extra degree of drama to the subject. To convey a sense of scale, I had my model hover three feet above the coral.
Pro tip: bring in the background
Almost everyone I know uses a dual strobe setup. While essential for lighting up the subject evenly in the foreground, when shooting wide-angle, many underwater photographers forget to think about the background. When it comes to the tropics, nothing says it better than balancing the ambient light with your own lighting to give it that inviting beautiful blue allure.
I am a firm believer in shooting manually, and this includes the strobes. At Wakatobi, my strobe output was rarely set above 3/4 power, more often the settings would vary between quarter and half power.

Before setting up any shot, my strategy always starts with knowing where the sun is, observing where the natural light is transitioning from bright to dark, and taking meter readings of the ambient light through the lens at each point. This allows me to establish a baseline for aperture values. I can then begin the work best to capture the blueness of the water in the background.
For example, at the site called Lorenzo’s Delight, I found a very large, beautiful red sea fan on the wall at 35m (110ft). At that depth the ambient light was still pretty good, allowing me to stay at 200 ISO with meter readings ranging between f4.5 and f5.6. Bump the ISO up to 400 and it is pretty much f/8 and be there. Once I had proper aperture values dialled in to capture the ideal blue of the water, I turned my attention back to the reef.
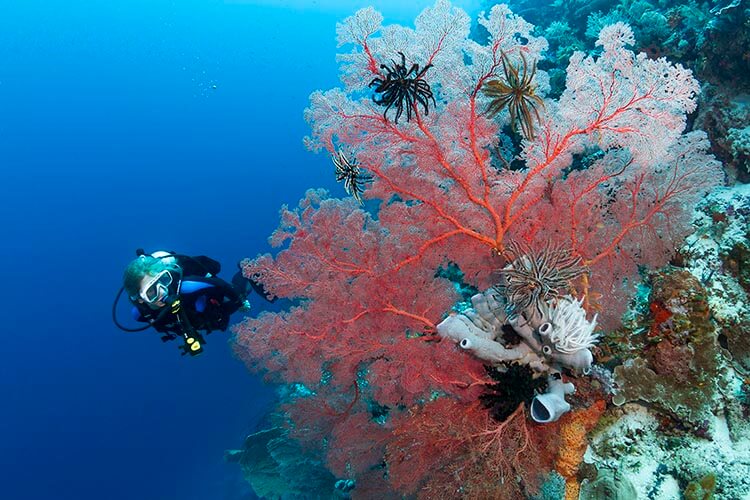
At that depth, the fan appeared more dark maroon than red, which I wanted to bring out, plus add a diver to the scene to give some scale of its size. To retain ambient light, I dropped the shutter speed slightly to 1/80 sec to an aperture value of f7.1 (plus minus half a stop) to maintain enough depth of field for both the fan and diver.
This entire process might sound a bit too methodical but remember that, unlike a fish, a reef isn’t going anywhere. You have ample time to review your results and make the subtle tweaks needed to dial in your lighting and composition. Because LCD screens don’t always tell the whole story, I always review the playback image against the camera’s histogram display.
Pro tip: adding a subject
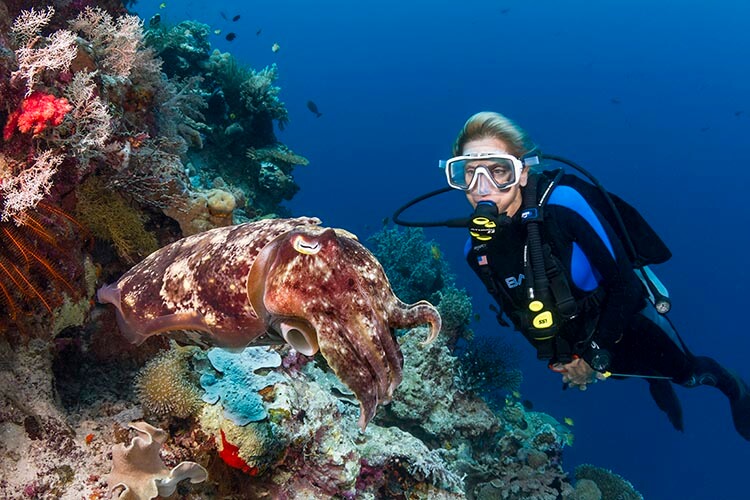
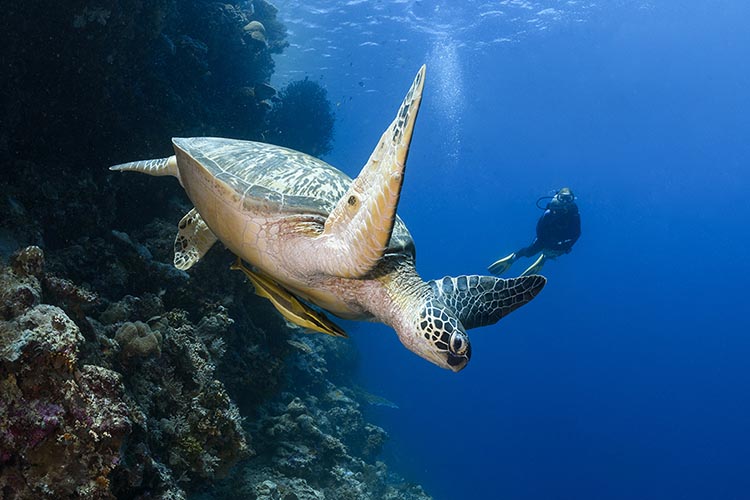
Including a marine life subject adds both scale and impact to wide-angle images. The key is finding a subject that is both interesting and approachable. I have found that the broadclub cuttlefish (Sepia latimanus) on the reefs at Wakatobi can be highly tolerant of divers. Providing you keep your movements slow and deliberate, they may allow you to get quite close for pictures.
Including a human subject in a wide-angle shot not only adds interest — people find other people interesting — it also adds a greater opportunity for telling a story. Rather than simply swimming through the frame, have your model engage in some element of the scene.
If you are partnering with another photographer, an easy trick to add a subject within the frame is to take a photograph of them taking a picture; if they are also shooting with a wide-angle setup as well, they will likely do the same as you.
When using fisheye lenses on people, the field distortion of the lens in the 10-11mm range can at times come off a little too excessive. I find this especially true when the subjects in a frame also include a marine animal. At such times I will often pull back a little, favoring the 13–17mm zoom range.
To up the ante a bit more, provided your subject is still being cooperative, you can shift positions and have another diver move slowly into the spot you just vacated to create a marine interaction portrait. Keeping your movements slow and deliberate to avoid alarming your subject will give you more time and opportunity to capture the shot, as opposed to trying to rush through it. Exercising a little discipline pays good dividends.
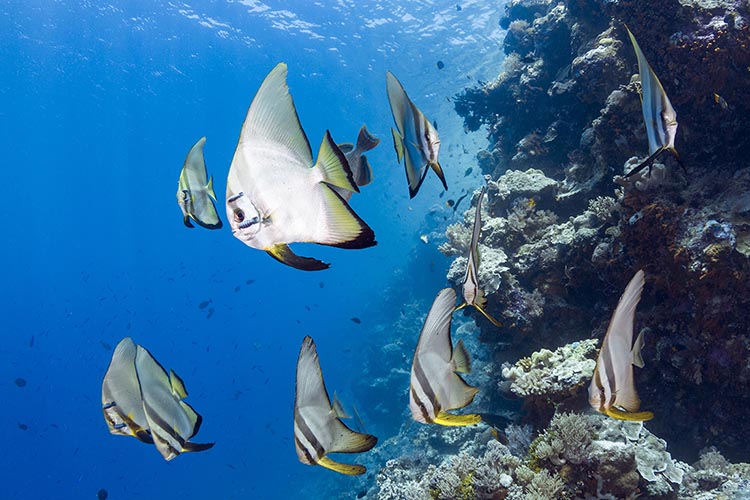
A school of fish will add a lot of life to your wide-angle photography, but they also can be flighty subjects, which will require you to anticipate the shot well before it happens. Here again, I suggest applying the same strategy I use for doing general marine-scape shots: take meter readings as soon as you are at depth, which enables you to establish a baseline for aperture values based on the surrounding levels of ambient light, and then be ready when that school of big-eye trevally, bumphead parrotfish, barracuda or batfish enter the scene and come into range.
Putting the focus on marine life
After capturing some of the stunning reef panoramas, you can then turn your attention to the marine life. During a dive at Roma, I happened upon a pair of large octopuses in what looked like a territorial dispute in the making, as both were taking up an erect posture two feet from one another.
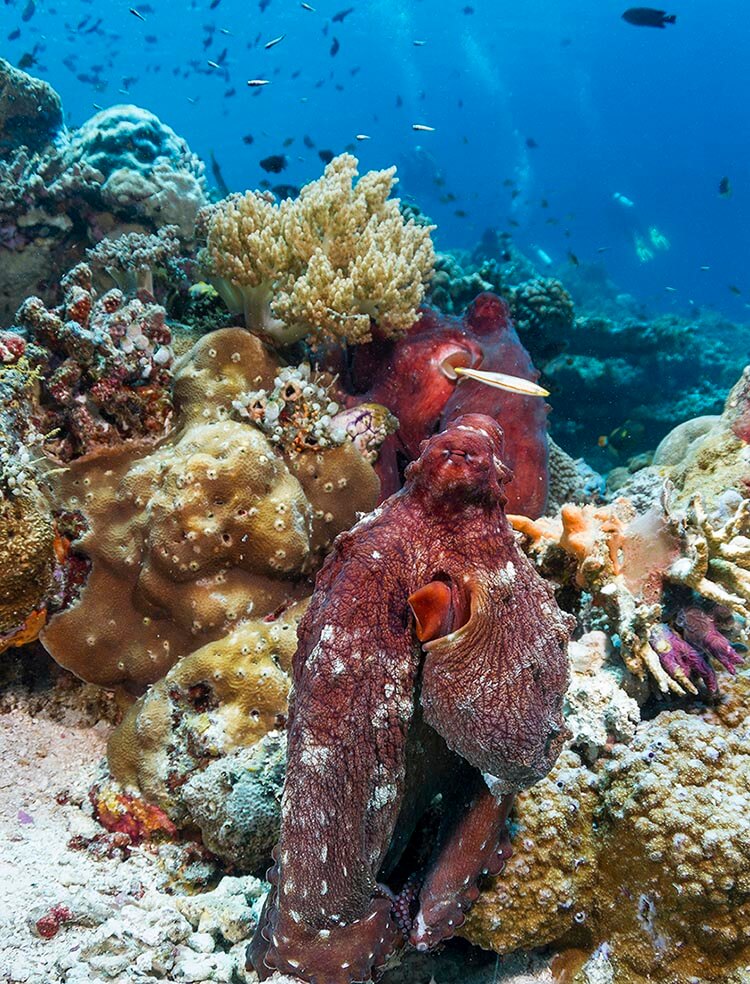
There was clear water and ample ambient light available to showcase both the vibrancy of the octopus in the foreground and the vista beyond. Only a subtle amount of strobe lighting was needed, as the working distance between lens and subject was less than a foot.
Why Wakatobi?

Wakatobi is well equipped to cater to all underwater photographers on every level, from amateur recreational divers learning their craft to professional photographers diving on rebreathers. Its boats are spacious and designed around large cameras, and a climate-controlled camera room is available on shore to keep your equipment as comfortable as its owner.
With such a great mix of beautiful reefs, drop-offs, and unique marine life subjects, as well as flexible dive services and choices, Wakatobi is an underwater photographer’s paradise for doing everything from honing your skills or adding new and exciting imagery – be it wide-angle, macro, or both – to your photo library.
More from Wakatobi
Discover more at www.wakatobi.com
