
If you want to get to a dive site as a quickly and safely as possible, learning how to deploy a shot-line could be the answer
By Charlotte Boan
Shot-lines are a welcome sight when boat diving in tidal and murky waters, particularly at depth, and learning to deploy a shot-line should be part and parcel of diver training. Although not essential for every dive, having a line direct from the surface to the dive site simplifies navigation on ascent and descent, aids orientation in low visibility, increases safety, and ultimately enables you to spend more time enjoying the dive. And, despite the inevitable diver jam, it’s safer to hold onto the shot-line on decompression stops.
A shot-line at its most basic design is a line attached to a weight that sits on the seabed or wreck and is held at the surface by a buoy. On most charter boat trips, a skipper will let down a weight or anchor in order to place the line at the dive site or moor up to a permanent line. On small boat trips, it’s the responsibility of the dive marshal to make sure the shot is deployed in the right place and in the correct way. While the skill of deploying a shot-line is not hard to master, it’s important to know about the construction and design of shots and to understand the safest and most effective system of deployment.
STEP-BY-STEP GUIDE TO DEPLOYING A SHOT-LINE
1. CHOOSE THE RIGHT LINE, BUOY AND WEIGHT
Line: the line must be thick enough for a diver to grip comfortably during ascent and descent. A thickness of between 10 and 12mm is ideal. The correct length of rope should be as long as the depth of the site, with a few extra metres to attach the weight and buoy – around 20 per cent. A top-tensioned shot needs a few extra metres (see Types of shot, below). The shot-line should be as near vertical as possible to give divers the shortest route to the site. This is why using an anchor as a shot-line should be avoided. However, if you choose to go with the anchor as a shot-line, make sure you have a spare on board in case of emergency, such as recovering divers in distress.
Weight: the weight needs to be heavy enough to stay put in a tide or current, but not so heavy that it is difficult to recover – 15 to 25kg is sufficient in most cases. When wreck diving, a grapnel makes a good sinker as it is easily secured in the wreckage by the first pair of divers and released by the last pair.
Buoy: the buoy should have approximately 50 per cent more buoyancy than all of the weights that will be used to hang from it. This will include a sinker weight, a counterweight if used, and the line itself. The buoy must have no less than 50kg buoyancy.
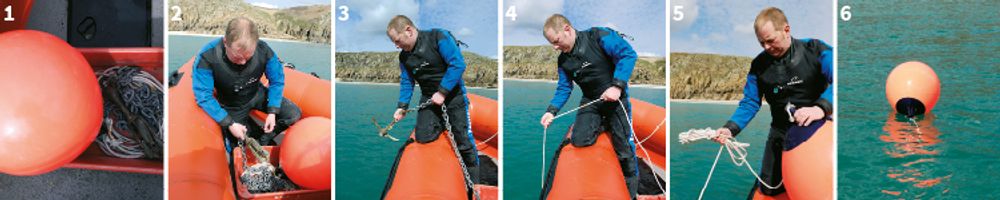
2 Tidy the line
Make sure the line has been carefully coiled to prevent it catching or entangling when you throw it overboard. When stowing the tidy line, feed it backwards (buoy-end first) into the bucket to prevent entanglement.
3 Pick the right spot
Locate the exact site and wait for skipper’s instructions on when to throw the weight into the water. Make sure there are no divers in the water below.
4 Weight in the water
Place the weight in the water and feed the line through your hands slowly, all the while checking for diver bubbles beneath.
5 Tidy the surplus line
When the line is fully taut, any surplus line can be tidied away at the top of the shot once the shot is in place. One way to do this is to attach a small buoy to the free end and let the line trail out on the surface. About 4m of line is ideal. This creates a tide buoy, so you can check the direction and start to gauge the strength of the current.
6 Buoy in the water
Once any surplus line is tidied away throw the buoy into the water.
TYPES OF SHOT
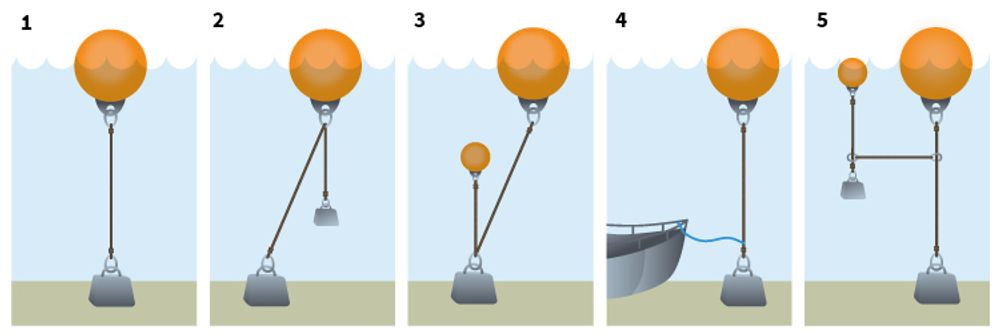
1 Simple shot-line
A simple shot-line is made up of a buoy, line and a weight. This is the most commonly used construction of buoy and, as its name suggests, is simple to set up. However, this set-up has its downsides, as the line has to be the correct length and does not allow for the fall and rise of the tide.
2 Top-tensioned shot
A rarely used system, this is, however, an effective way of overcoming problems of the simple shot-line construction. The counterweight keeps the shot vertical, compensating for any tidal rise or fall. There is a risk of the top weight becoming entangled.
3 Bottom-tensioned shot
A similar idea to the top-tensioned shot, but with an extra buoy fixed to the bottom end of the line. It offers the same advantages and disadvantages as the top-tensioned shot-line but is easier to construct.
4 Shot line with waster
This system is the wreck diver’s favourite, as it prevents shot-lines becoming lost or entangled. The shot-line with waster is basically a light line, which is attached to the main line before deployment. The first pair of divers in the water ties the shot to the wreck. It is up to the dive marshal to ensure divers do not pull the shot-line off the site and to make sure that the last pair of divers to free the shot is definitely the last pair.
5 Lazy shot
Useful for fitting a decompression trapeze, the lazy shot is constructed of two shot-lines. A second shot-line is attached to the main shot-line at, or below, the deepest decompression depth. It allows for the attachment of an emergency gas supply.
